| The Ring Nebula As Seen by Different Instruments |
||||
| This was the first deep sky object I looked for in my
telescope, in the summer of 1997. I'd seen a small picture of it in a book I bought when I
was 9 or 10, Donald Menzel's Field Guide to the Stars and Planets, and I used the
same book 25 years later to find the real thing. |
||||
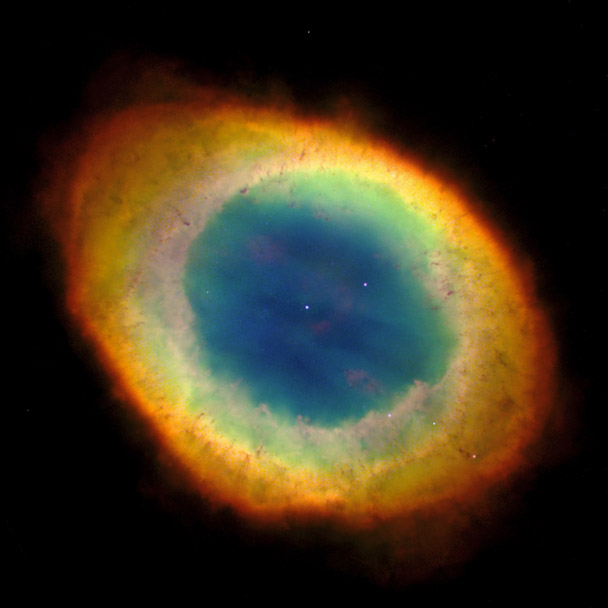
 Messier object 57, the Ring Nebula, is in the constellation Lyra, high in the northern hemisphere sky during July and August. Look straight up for Vega, the fifth-brightest star in the sky, and near it you should find a parallelogram, or crooked rectangle. M57 lies between Beta and Gamma Lyrae, the corners farthest from Vega. The field of view in 10 x 50 binoculars is about 6 degrees. The image is magnified by a factor of 10, and the objective lenses (the ones on the front) are 50 mm in diameter. In the dark, the pupils of your eyes open to a width of about 7 mm, so the 10 x 50s have about 50 times the light-gathering area. The binoculars easily reveal that Epsilon Lyrae is more than one star. But as we center the view between Beta and Gamma, where M57 lies, we still can't see the ring. It's too faint to be seen without a telescope. On a dark night, looking through an 8-inch f/6 reflector, we can finally see a small ring. Using a 20mm Plössl eyepiece, the field of view is about half a degree, the size of the full moon, and the image is magnified by a factor of 60. The 8-inch mirror gathers 800 times as much light as the unaided eye. We could use an eyepiece with a shorter focal length to increase the magnification. This darkens the image and sometimes enhances the contrast. But it also magnifies minor imperfections in the telescope, any unsteadiness in its mount, and the interference of the atmosphere. During a visit to the Vega-Bray Observatory in southern Arizona, I was able to learn about CCD imaging using their computer guided 20-inch f/10 Maksutov Cassegrain telescope. The larger aperture brightens the image and allows higher magnification. You can see the central star, which is a million times fainter than Vega. The Hubble Space Telescope uses a 94-inch f/24 primary mirror. M57 doesn't quite fit in the L shaped 2.5 arcminute field of the Wide Field / Planetary Camera 2, so this image required two separate telescope pointings. Orbiting at an altitude of 600 km, HST is free of the blurring effects of the atmosphere, but cosmic ray streaks must be subtracted from the CCD images, a problem not encountered on the ground. |
 |
|||
 |
||||
 |
||||
 |
||||
 |
||||
About the Images map. The map of Lyra was drawn in Adobe Photoshop with (1) in a background layer. 1,2. Rendered using LightWave
3D, a general-purpose 3D animation program. Star positions and magnitudes were taken
from the Positions and Proper Motions catalog (Roeser, Bastian et al., 1988- 3. The center is a scaled version of (4). The surrounding stars were drawn in Photoshop with the appropriate area of the Digital Sky Survey in a background layer. DSS and other images are available from the web-based SkyView virtual observatory. 4. CCD image taken the night of July 7-8, 1999 at Vega-Bray through their 20-inch Mak.
Since monsoon season had just begun in southern Arizona, we had to wait until after
midnight for the sky to partially clear. The camera was an Apogee AP2 with a 1536 x 1024 Kodak
KAF-1600 chip. It was controlled by version 4.05 of Axiom Research's MIRA Pro image processing and analysis
software. This was a 40- 5. Taken by the HST WFPC2 on October 16, 1998 and released to the public January 6, 1999. See the Hubble Heritage Program's press release and information links. The WFPC2 Handbook is the technical reference used by astronomers to plan observing sessions with this instrument. I rotated the image in Photoshop so that it would match the orientation in 4. The image was also cropped and scaled. The color HST image is a composite of exposures taken through three filters, each of which only lets in the light of a single emission line from a specific ionized molecule. The image from each filter is assigned to the RGB color channel nearest the wavelength it passes.
To see the component filter images, load the color image into a program like Photoshop and look at the color channels separately. Compare the filter wavelengths to the CIE chromaticity diagram on my color spaces page to see how close they are to traditional RGB color primaries. I no longer take the Menzel book into the field, since its binding has become somewhat fragile. It's also become a bit of a collector's item. The current edition, edited by Jay Pasachoff, is still a nice book, but it lacks the inspirational photographic charts of the 1962 edition. |
||||